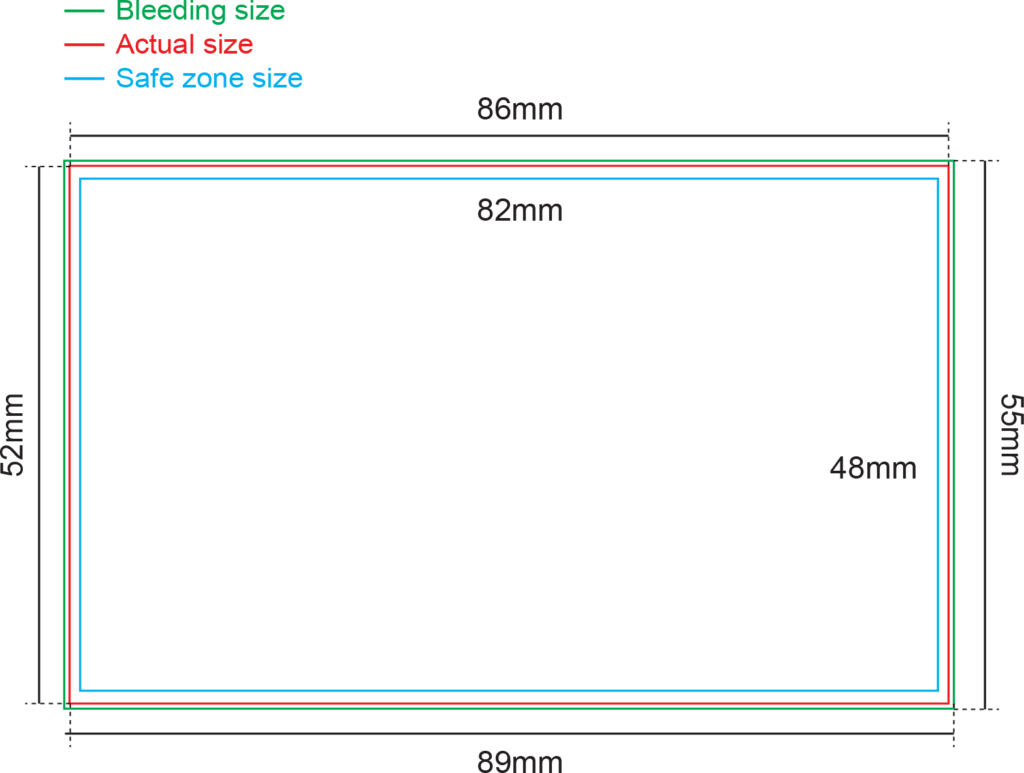
Artwork Dimension : (Refer to diagram)
Bleeding : 1.5mm each side |
Margin (Safe Zone) : 2.0mm each side
FILE FORMAT
Adobe Acrobat Document (*.pdf)
Provide better printing quality
JPEG Image (*.jpg / *.jpeg)
Provide fairly good printing quality if the file is converted under certain specification but text or vector images appear less sharp compared to PDF file format. JPEG file format : Set resolution at or above 600dpi.
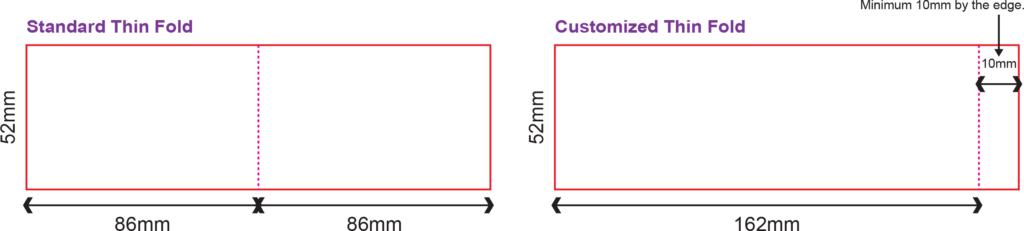
CREASING FOR THIN FOLD AND FAT FOLD
Only 1 creasing line
Customized creasing are acceptable, minimum 10mm by the edge
THIN FOLD OPEN SIZE
Example : 52mm x 172mm
FAT FOLD OPEN SIZE
Example : 86mm x 104mm
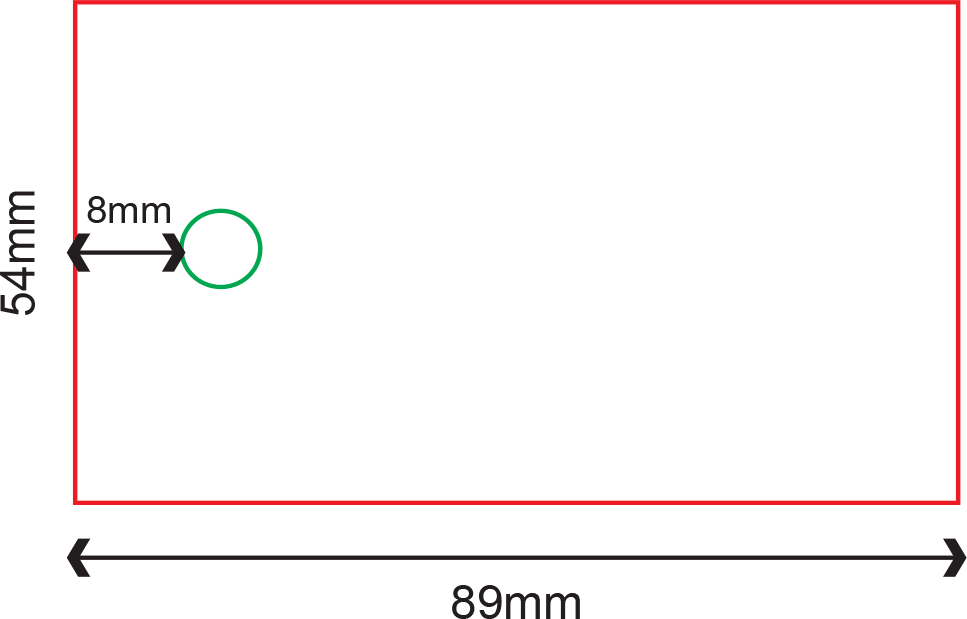
HOLE PUNCHING
Diameter 3mm / Diameter 5mm
1 Hole at fixed position (Shorter side) at Centre of Top
Not applicable for Thin Fold and Fat Fold
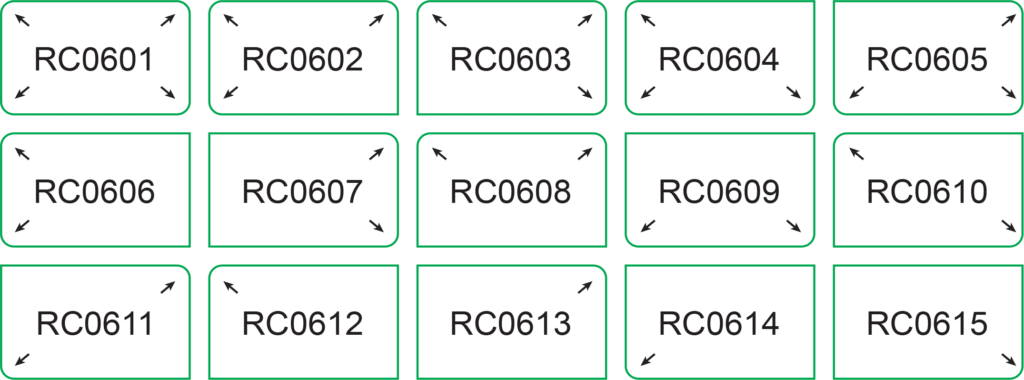
ROUND CORNER
Radius 6mm -15 types of options
Not Applicable for Thin and Fat Fold
The round corner position if follow exactly as shown in ordering page diagram for either portrait or landscape.
No rotation required.
ARTWORK
Artwork is prepared in our Product Size Templates
Background design expand to Full Bleed size
Vital elements are within Safe Zone
No crop mark are applied
FONTS
No fonts of less than 4 pts
Curve / Path / Create outline all fonts
DESIGN
All images have been exported / converted : Background, design effects, photos, images to TIFF files (not including text / vector images)
Never manipulate images in layout program
Resolution : 300 dpi
Color Mode : CMYK color mode
LINE WEIGHT
No lines are less than 0.25pts
Color : CMYK mode
MARKING & TRAPPING
Remove all the crop mark or guide lines before submit the artwork.
FILE FORMAT
PDF File Format Artwork is saved in required file format : Adobe acrobat Document (*.pdf)
Resolution : 300 dpi
Color Mode : CMYK color mode
Total File Size (front and back design) : smaller than 20 MB
JPEG File Format Artwork is saved in required file format : JPEG file format (*.jpg)
Resolution : 600 dpi
Pixels Dimension : 2100 x 1300 pixel
Color Mode : CMYK color mode
Total File Size (front and back design) : smaller than 20 MB
FINISHING
For full details of how to prepare your artwork for finishing such as:
Spot UV
Hot Stamping
Round Corner
Kindly refer to the General Guidelines at our website.
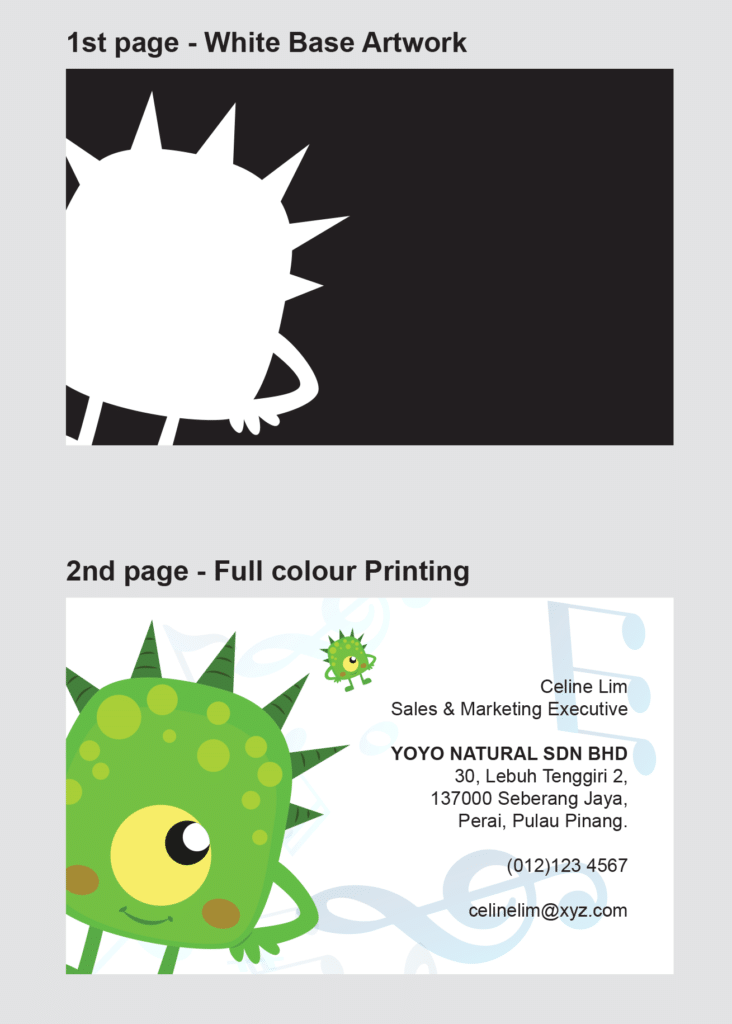
ARTWORK PREPARATION FOR FROSTED PLASTIC CARD
For order with 4C + White
Page 1: White artwork with Process Black Colour (K100)
Page 2: Printable artwork only (CMYK)
For order with 4C
Page 1: Printable artwork only (CMYK) White Base Artwork followed by Full colour Printing.
IMPORTANT NOTES IN PREPARING WHITE BASE ARTWORK
Fill the artwork with black (K100) to indicate the area for white base.
Rename colour to precisely “White” to indicate the area of white base instead “WHITE” or “white”
*Expressprint will not held responsibility on any wrong white spot colour naming error. (eg. “WHITE” or “white”)
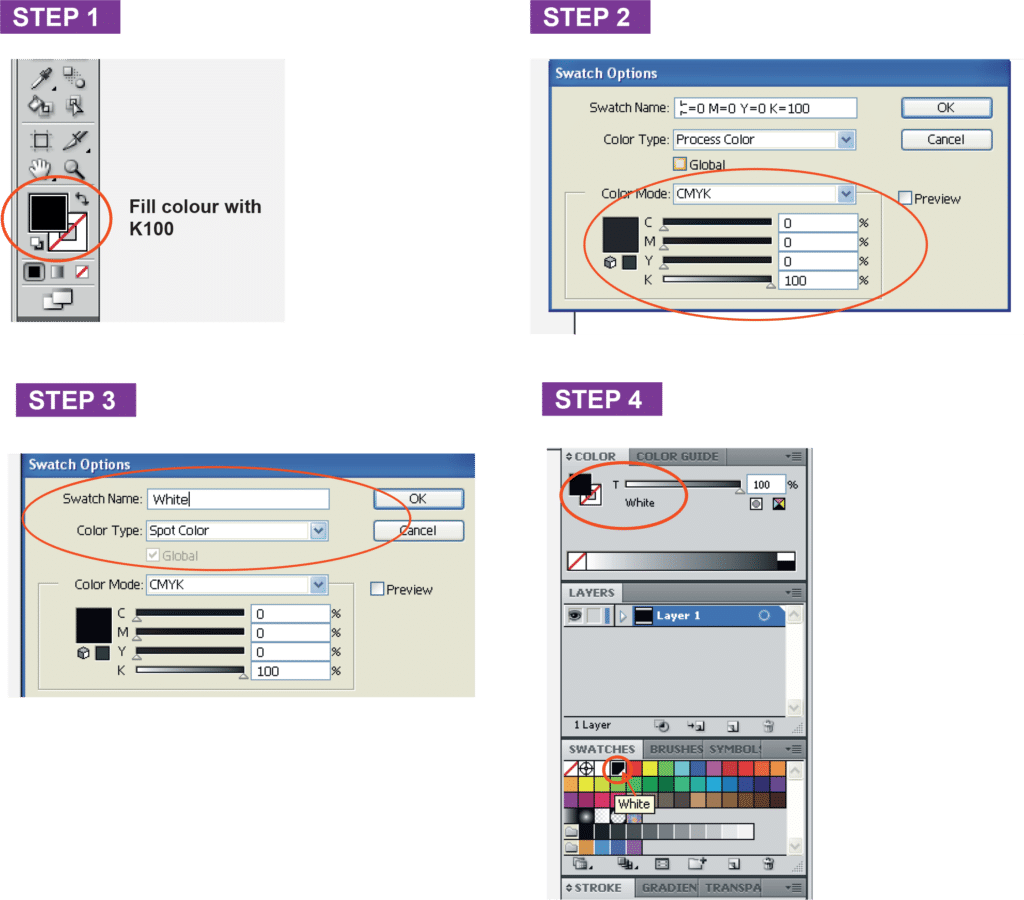
Only use Adobe Illustrator to prepare the white base artwork. Rename the color swatch name by using Adobe Illustrator
Fill colour with K100
Double Click the colour at Swatches
At Swatch Option Choose Color Mode to “Spot Color” and rename the Swatch Name to “White.
Double confirm by checking the artwork is filled with K100 with “White” swatch name.
ARTWORK PREPARATION FOR CUSTOM DIE CUT BUSINESS CARD
Front
Page 1: Overview artwork (CMYK + Die Line)
Page 2: Printable artwork only (CMYK)
Page 3: Die Line only *Die-line must ONLY in a single line with colour (C100,Y100)
Back
Page 1: Printable artwork only (CMYK)
IMPORTANT
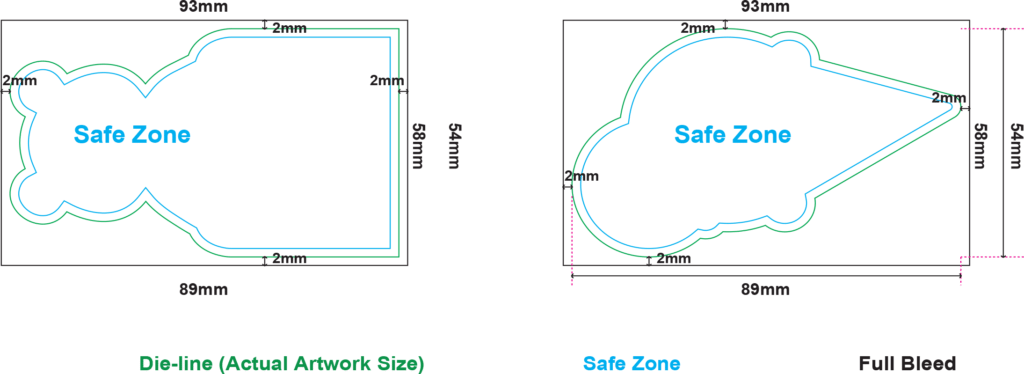
Safe Zone: Vital elements of artwork MUST BE within the Safe Zone, 2mm from all sides of die-line.
Full Bleed: Expand your background design (bleeding), 2mm from all sides of Artwork Height & Width dimension.
Please refer to the example below how to determine your Artwork Size, Safe Zone & Full Bleed.
SAFE ZONE, BLEEDING, DIE LINE
Example:
Input the artwork actual size at Ordering Page when you place order. Let’s say your artwork = 54mm x 89mm Actual Artwork Size 54mm x 89mm Full Bleed Size 58mm x 93mm Safe Zone 2mm from all sides of die-cut edge
PREPARING FILE FOR BUSINESS CARD WITH DIE LINE ARTWORK SPECIFICATION
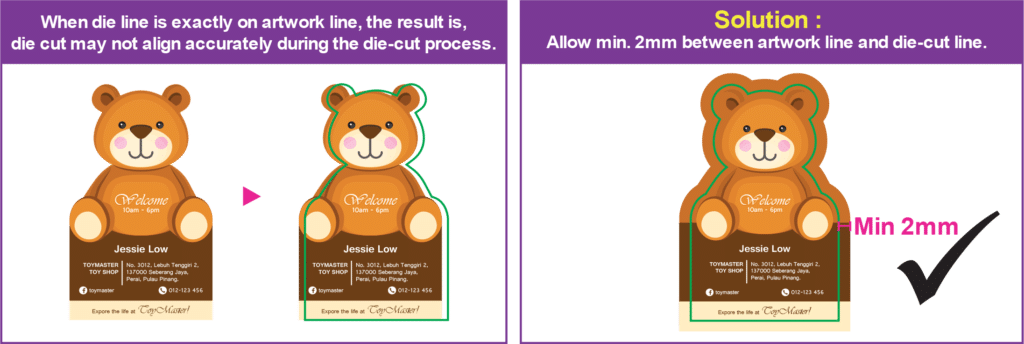
DIE LINE PRECAUTIONS
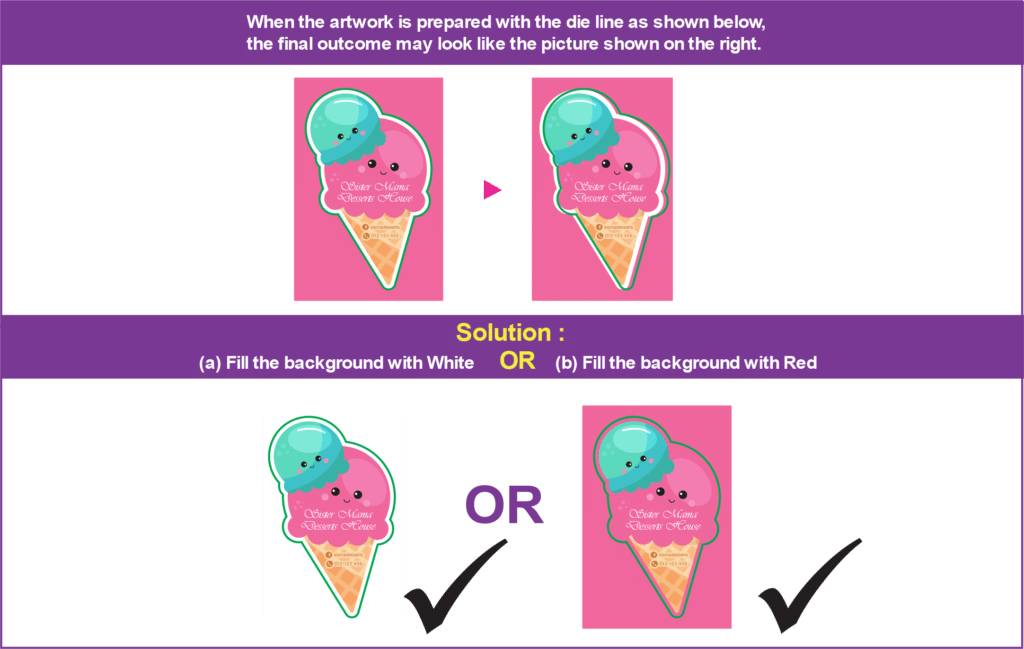
Cutting Edge Tolerance: + – 1mm Below are mis-registration scenario that can be happen during the die-cut process when die line is not correctly placed, Scenario 1: What happens when die line falls exactly on the artwork line.
Scenario 2: What happens when die line is exactly on different colour background.
* Customer is advised to revise artwork when these problems are detected. * Expressprint shall not be held liable for any of defect in printing outcome due to artwork sent not correctly prepared as advised.
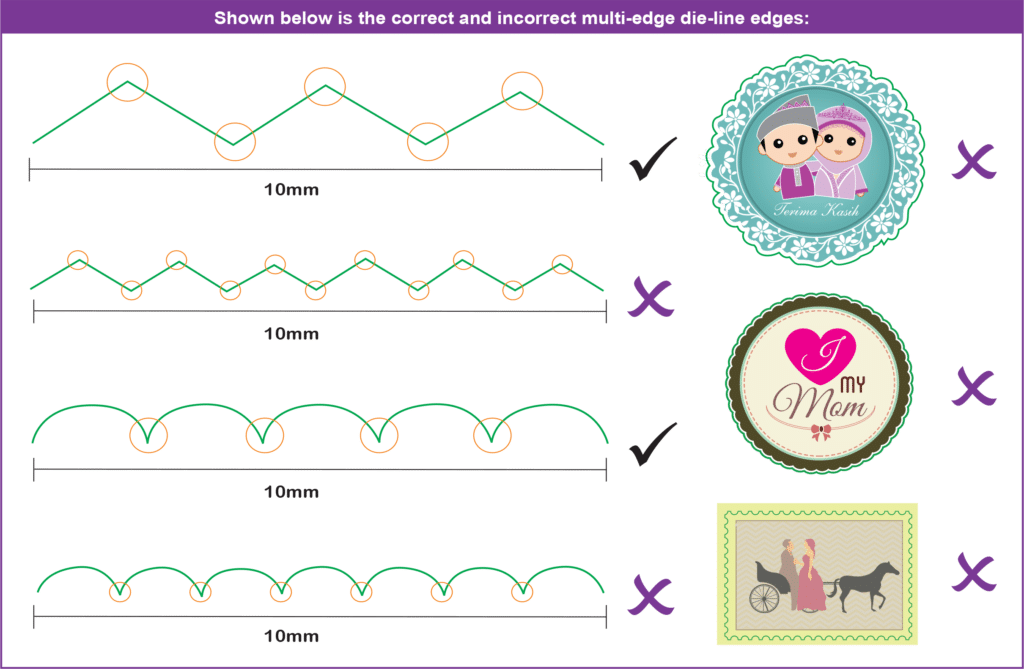
GAP BETWEEN MULTI-EDGES DIE LINE
How to define “Multi-Edges Die Line” – More than 5 cutting edges within 10mm.